I know you guys like a bargain as much as I do - Well Sarah over at Modern Country Style has a great Farrow and Ball giveaway. 3 Sample pots for 10 lucky winners Plus the chance for a 5L tin,
Get yourselves over there and check it out.
http://moderncountrystyle.blogspot.com/2011/10/farrow-and-ball-giveaway.html

Bumblebee Cottage - A lifestyle and interiors blog - with a little bit of Craft thrown in.
28 October 2011
Oh what a difference a day makes
Hello hello, How you all doing?
Its been a couple of days since the last post - keeping very busy this end. I expect you are all dying to see what happened after the fireplace went in - yes I know you all that well.
I shall hold you in suspense for no longer. The plaster board went on. Exciting stuff huh?
It was fab actually - finally got a sense of the space and light in the room.
We also got the lights and electrics done. Both were pretty quick processes really as we had a electrician in and my dad is a plasterer.

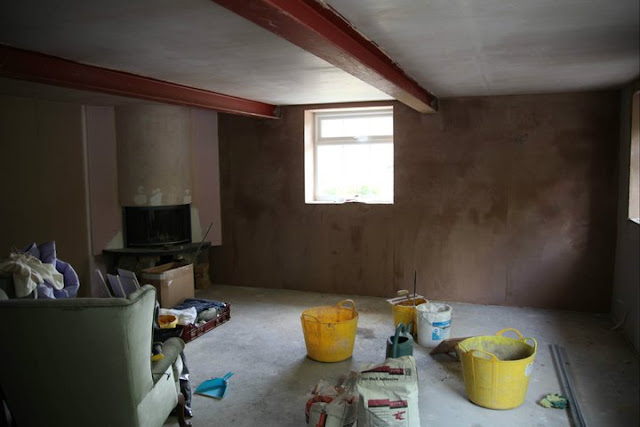 The ceiling was the biggest change from the very heavy dark joists. We chose recessed spot lights with halogen/led bulbs because we needed a lot of bulbs in that room and because the ceiling in there is low. We also opted for 4 wall up lighters. All our lights went on to dimmers which I am really pleased about as now it really gives a lot of options in terms of both energy use and of mood in the room. Each bay of the ceiling is on a different circuit so they are all individually controlled.


 Financially by this point the work was taking its toll so we decided not go go for a luxury wall paint but to give it an all over coat with the Dulux Paint pod that we own in a simple white colour. We will re-paint later down the line.We had already decided that the ceiling should be the same colour as the walls to make the ceilings seem higher. In the end we went for Timeless white ( as we already had half a pod full from a previous job). It took an age painting it all even with the Paint pod. But the difference was enormous!
 My dad did a fab job plastering the curve of the fireplace.
Oh and we put some curtains up too - as we took over doing all the work at this stage we were working most evenings. The pic above was taken at about midnight. For the curtains I headed over to Dunelm Mill and got some Hessian style natural curtains.
Starting to look room like isn't it? Next begins the saga of the floor - and boy was it a saga!
Its been a couple of days since the last post - keeping very busy this end. I expect you are all dying to see what happened after the fireplace went in - yes I know you all that well.
I shall hold you in suspense for no longer. The plaster board went on. Exciting stuff huh?
It was fab actually - finally got a sense of the space and light in the room.
We also got the lights and electrics done. Both were pretty quick processes really as we had a electrician in and my dad is a plasterer.


Oh and we put some curtains up too - as we took over doing all the work at this stage we were working most evenings. The pic above was taken at about midnight. For the curtains I headed over to Dunelm Mill and got some Hessian style natural curtains.
Starting to look room like isn't it? Next begins the saga of the floor - and boy was it a saga!
21 October 2011
Busy Bees
Hello, Hope you are all prepared for the weekend. I think its going to be a very cold and very busy one!
I thought today I would share with you all the next step in our living room make over. I left off with a horrid grey screed and a shiny new window.
So once the screed was dry we were able to get the Fireplace done. Now this is something special as it is my area of expertise. That's right I have hidden talents. I chose the fireplace before we even moved in. Its a risk as it is very contemporary and the house was built in 1888. But I like to mix it up. See what you think.

Isn't it a stunner? Well I love it. So after lots of long calculations I managed to order the custom shaped honed granite hearth from a fantastic supplier called Worcestershire stone and Marble. I went with honed granite as it is super durable, easy to keep clean and I love the matt effect. So it started to take shape thanks to my fitting team at Oxford Fireplace Centre. Isn't it shameless plugging your family business??

There it is, hanging from the new beams so that the screed could go in. I left my boys to it and stayed out of the way for the install - nothing worse than a client lingering over you when you need to adjust with a hammer.
Below is at the end of the day.

Excuse the pink - that is the heat resistant boarding. But doesn't it look great? The board over the fire ready for plastering - and a similar curve will go below to cover the supporting blocks. Our honed granite hearth is really going to make the installation.
So I worked out that if we had a fireplace in the room was pretty much livable. After months of sand and mess I wanted one evening in the room . So I set up for a romantic picnic.

A Blanket pinned up at the window and the black jack painted walls made for my kind of shabby chic! Beautifully warm and the first of many more happy evenings to come in our new room.
Please leave me a comment and let me know what you think of our new fireplace.
18 October 2011
Inspiration
Good afternoon all.
Hope you all had a lovely weekend and are back in to the swing of things.
Before I launch back in to our living room renovation I thought I would share with you all a couple of inspiring images that I found on Pinterest.
I find looking at all these messy sandy screedy pictures quite tiring. Its vital when doing a big renovation like this to have a door that you can close on all that mess and a book of images that you love or some good blogs to follow to keep your eyes on the prize. Its all to easy to loose sight of what all the mess will become and to get bogged down by it all.
So below are a few lovely inspiring images that kept my mind off the sand and on the sofas!


Aren't they beautiful. For more amazing images I suggest you get your butt over to Pinterest.com and check out some of the awesome ideas that are on there.
Speak to ya all tomorrow x
14 October 2011
Screed-a-liscous
Wanna see some Sand? Of course you do - Who wouldn't want to look at sand. I mean honestly!

So they levelled the floor with sand and started on our new wall. The wall will support the 2 new beams and separate the living space from the hallway. That row of blocks is still below floor height.

Then goes on the lovely base layer of concrete over the membrane that will keep this place water tight.
Then up goes the wall.

On the right hand side you can see our inset fire ready to go in. We had to have it dropped off early so we could get it through the garage door before it became a window!

So the wall goes up creating our extra wide opening to the living room. The small existing window on the right of this image comes out and is boarded up ready for the door. A new board is also put up to cover where the garage door has come out.

The supporting steels go in and are propped so that the pad stones can be put in under them. This is about the time I started getting really excited as the proportions of the room make themselves evident.

The builders finish the window opening and clear out. Then they lay the new screed, which we had to refrain from walking on for 2 days (much harder than you think when you cant see the whole room from the door you can get to).
Its a shame I got too keen and left a footprint in it ....
So we have a floor. And next we have a Window.

We used the bricks from the doorway opening that we created to fill under the new window with matching stones. And we used the same local glazier who made the windows for the kitchen (left) so that the windows match.

So as promised. A window and some Screed.
Have a great weekend. Next week I'll tell you all about how we reclaimed the original floor boards from the Granary loft above to give ourselves a living room floor and you can all take a look at our new living room with some great before and after shots - because we all love those!!
12 October 2011
Mess
Good Afternoon! Hope your week is going well. I am feeling particularly Autumn-y today. Something about grey English weather makes me want to rush out and buy fluffy boots.
But back to business, yesterday I promised a look at the chaos that we lived with for a couple of months to get our Garage converted. Well here it is.

Lovely isn't it. 7 skip loads were dug out and removed. They dug down a few feet - and hit water. This view was taken from my Kitchen door. It was very hard to maintain good order in the rest of the house (which we had to do for the lodgers as well as our own sanity!).


Points to note :
Non supporting main beam on resting on the pipes over the door
Alcove on the right destined to be the TV alcove.
Enormous Freezer (I made the mistake of letting my husband choose and purchase the freezer. Its so large that we have had to alter the plans to make a suitable space to accommodate it!!!)
At its worst just after the concrete was poured in to the new foundations.

But it does get better. Next up I'll share the screed and window going in.
But back to business, yesterday I promised a look at the chaos that we lived with for a couple of months to get our Garage converted. Well here it is.
Lovely isn't it. 7 skip loads were dug out and removed. They dug down a few feet - and hit water. This view was taken from my Kitchen door. It was very hard to maintain good order in the rest of the house (which we had to do for the lodgers as well as our own sanity!).

Every evening when I got home from work I eagerly looked forward to opening the door and seeing how far the builders had progressed.

Non supporting main beam on resting on the pipes over the door
Alcove on the right destined to be the TV alcove.
Enormous Freezer (I made the mistake of letting my husband choose and purchase the freezer. Its so large that we have had to alter the plans to make a suitable space to accommodate it!!!)
At its worst just after the concrete was poured in to the new foundations.

But it does get better. Next up I'll share the screed and window going in.
11 October 2011
Floor Plans
Good Afternoon readers. I thought I might share with you our floor plans today to give you all a bit of a better idea at what we are looking at here. We are planning to change quite a lot within the house to make it a more sensible layout.
So below is the Survey drawing of the Ground floor as it was when we moved in.

I should probably explain that what my husband and I have bought is half a house - we are splitting a larger property in half to make 2 homes, my parents owning the other half. Hence at point of survey there was no living room or front door. The garage door you saw on the front of the house is top left on the survey above. Below is a photo of the garage just after we moved in.

As you can see - not exactly beautiful but a very useful space. However as this room is nearly larger than our last house we decided to make use of the amazing loft space that we have here and move some of this clutter out to make way for a shiny new living room and hallway.
Below is the plan of what we are hoping to achieve (eventually)

So we began with the garage. My husband and I both work from home at times so it was top priority to make a living room where we could sit and not think about work.
The first problem we encountered was that the supporting beam was not supporting. Yep. If you check out the photo below you'll see the main beam is supported by a prop in the window - not something I really wanted in my new living room. Even worse - the other end of that beam that we assumed went in to the wall in fact rested on the water pipes that were clipped on to the wall.
My structural engineer nearly had kittens. So 2 new RSJ's in to support. And a new structural wall to support them. Which meant foundations. Which meant mess and diggers. So we began clearing the way for the builders to come in. By the end of 2 days hard slog we managed to get it cleared and looking like this.

So tomorrow I'll show you a little of what the Builders did to start making this in to a living room.
Have a fun Tuesday!
10 October 2011
A touch of Pewter
Hello hello, Nice to see you all again. I hope you had a lovely weekend. I enjoyed a fun party and a lovely day lounging about with my Husband watching the rugby and cuddling in front of the fire. Such a rare event lately as we have been so busy with the house.
Today, however, is a different matter all together. Do you ever have days where you imagine that you are going to get loads done and in fact can't seem to finish a single task?! Well that's me today. A late start, a couple of deliveries, an appointment with a chimney sweep (that I had forgotten!), a lost kitten (now found), a broken dishwasher and sporadic Internet are just some of my delays today.
So my first achievement for the day will be completing this blog post. And as promised its all about door knockers. I LOVE door knockers And there are so many to choose from. Just look at these fab and unusual options.
 For my front door I loved the idea of something Pewter, not too new looking. But it had to be substantial, heavy - something that you could actually use.
So I began my search online and then took my wish list of ideas to my local ironmongers (Oxford Ironmongery) as I am a big fan of little businesses. They were amazing and happened to have on display my very favourite door knocker from my Internet research

So take another look at my door. I love it. Hope you like it too!

Today, however, is a different matter all together. Do you ever have days where you imagine that you are going to get loads done and in fact can't seem to finish a single task?! Well that's me today. A late start, a couple of deliveries, an appointment with a chimney sweep (that I had forgotten!), a lost kitten (now found), a broken dishwasher and sporadic Internet are just some of my delays today.
So my first achievement for the day will be completing this blog post. And as promised its all about door knockers. I LOVE door knockers And there are so many to choose from. Just look at these fab and unusual options.

So I began my search online and then took my wish list of ideas to my local ironmongers (Oxford Ironmongery) as I am a big fan of little businesses. They were amazing and happened to have on display my very favourite door knocker from my Internet research
 |
| Dartington Pewter Door Knocker Rose |
Isn't it dreamy. I could just look at if for hours. When I got in to the shop I saw that its actually much bigger than it looks. My whole hand fits round the decorative detailing at the bottom. However it was well outside of what I had planned to spend (If memory serves it was over £170 - eek). You could see where every penny had gone in the workmanship and quality. But we had too much else to spend out on. So away I went. No door knocker. With the decision to save my pocket money up to buy it.A couple of weeks later I had an email from the girl in the shop telling me they were changing their displays and would I like their ex-display model for less than half price.... Would I??? Of course I would.
It was pristine - and either way door knockers are meant to be knocked. I went straight round to collect it and it was on the door by the end of the day. My pocket money and the budgeted amount for the door (that we got free!) also enabled me to get the matching door handle and letter plate.
 | ||

So take another look at my door. I love it. Hope you like it too!

08 October 2011
Colour Troubles
Have you ever gone to all the effort of painting something only to decide that you hate the colour afterwards?? Well this is exactly what happened on our front door.
Initially I ordered this door from Wickes for our door. Affordable - compared to the custom made Iroko ones I was looking at before I came back to the real world - and rather pretty I think.


 At about this stage my husband starts insisting that they are exactly the same colour and either will be fine. So I pop down to Relics of Witney and look at their amazing light panels. They show different lighting situations and give great advice. They were really helpful and I tried samples of both - still no decision. In the end I take the plunge and go with Farrow and Ball. I set to priming ( somthing I usually cant be bothered to do - but Relics said to so I did) and painting. I finish the door , stand accross the road, and declare to my husband that its not right.
Back to Relics one can of Little Greene and a quick re-paint.
Now I love it. No one but me thought the door was wrong before. But its my door so thats fine.

Later I'll tell you about the door furniture choice and begin the build up to our first big reveal
Happy Weekend!
Initially I ordered this door from Wickes for our door. Affordable - compared to the custom made Iroko ones I was looking at before I came back to the real world - and rather pretty I think.

I liked the look of the wood and I could have always painted it later if I got bored. Thankfully the day after ordering I realised that the size of the opening didnt look right. A quick consultaion with the architechts drawings revealed that we needed a custom height door. Doh.
Builders to the rescue- they have a few old doors in their yard that they could look through and see if one fits. Its my lucky day as they bring along a temporary door to fit while I am waiting for a custom door to be made.

Me : "What will you do with it once you take it from here?"
Builder: "Probably burn it ... We have far too many in the yard and nothing to do with them"
Me: "How much do you want for it?"
Builders: "Nothing, If you ahve this one it means my boys can get on"
Me: * Jumping up and down clapping Calmly "Ok thats fine"
So how to make it beautiful? A good scrub was a good start.
For paints I was torn between Farrow and Ball's Pitch blue and Little Greenes Juniper Ash

Back to Relics one can of Little Greene and a quick re-paint.
Now I love it. No one but me thought the door was wrong before. But its my door so thats fine.

Later I'll tell you about the door furniture choice and begin the build up to our first big reveal
Happy Weekend!
07 October 2011
The Beginning
Its always difficult knowing when to start, or even how to start - or even if you should start. However I have decided to take the plunge. Its time to share some my experience of turning a house in to a home - or even a garage in to a living room!
I'm Sara. Very happily married with no children (yet) and a beautiful period house that used to be a granary. We live in a small Cotswold village in England.
We have had the rather wonderful oppertunity of naming our house -through circumstances which will become clear later.
Before we even moved in to the house -( in fact before we had even exchanged contracts!) - we had already picked the name. It took us ages to decide but Bumblebee Cottage won.
Bumblebee to me evokes such a lovely slow pace of life, bumbling about smelling the flowers. Cottage gives such a pretty mental picture (that completely didnt tally with the house when we bought it! At least not internally.)
So to begin - would you like to see our lovely house...?
Of course you would - nothing nicer than having a good snoop! Well snoop away.

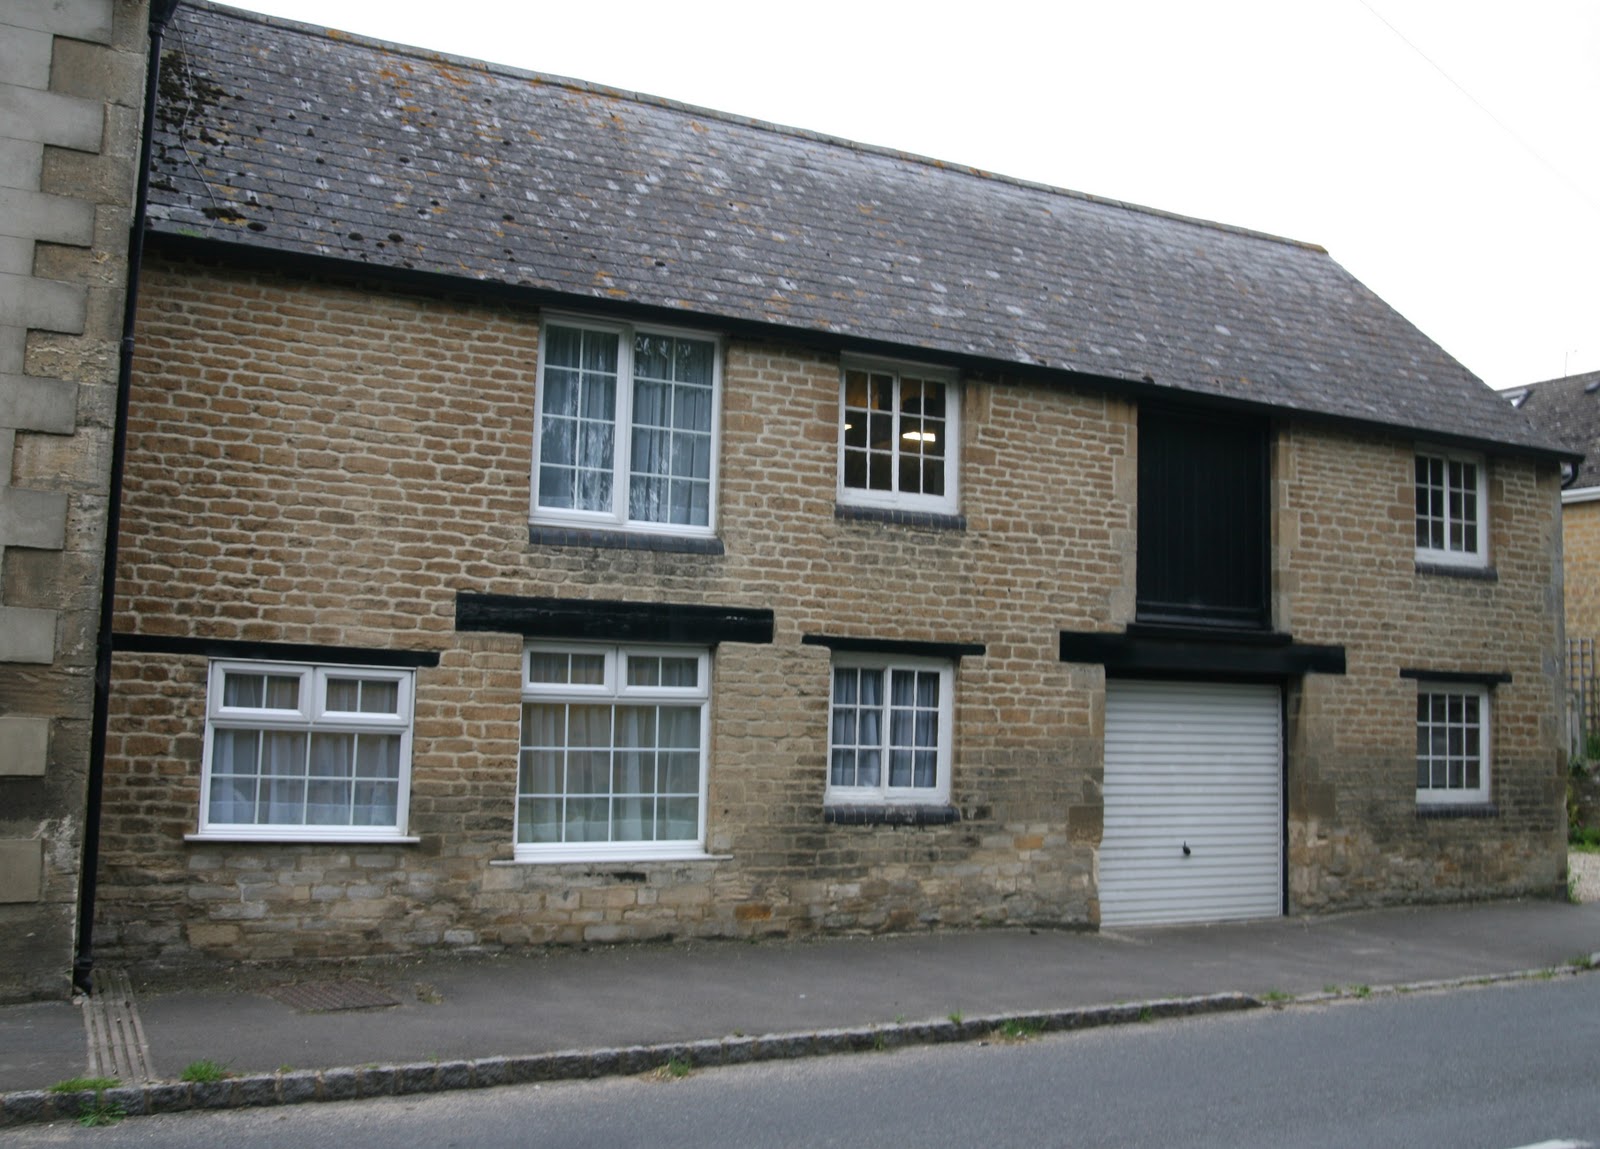
I know what you are thinking. How do you get in to that lovely house? - there is no front door
And quite right you are. For the first year we had to use the back door. However as we near the completion of our first room we have a front door - and a window instead of a garage door.
Whoooooo
So would you like to see it now ? Yes?

Not bad eh?
So tomorrow I will tell you all about my free front door - yes free.
And what I did to make it lovely!
I'm Sara. Very happily married with no children (yet) and a beautiful period house that used to be a granary. We live in a small Cotswold village in England.
We have had the rather wonderful oppertunity of naming our house -through circumstances which will become clear later.
Before we even moved in to the house -( in fact before we had even exchanged contracts!) - we had already picked the name. It took us ages to decide but Bumblebee Cottage won.
Bumblebee to me evokes such a lovely slow pace of life, bumbling about smelling the flowers. Cottage gives such a pretty mental picture (that completely didnt tally with the house when we bought it! At least not internally.)
So to begin - would you like to see our lovely house...?
Of course you would - nothing nicer than having a good snoop! Well snoop away.
I know what you are thinking. How do you get in to that lovely house? - there is no front door
And quite right you are. For the first year we had to use the back door. However as we near the completion of our first room we have a front door - and a window instead of a garage door.
Whoooooo
So would you like to see it now ? Yes?

Not bad eh?
So tomorrow I will tell you all about my free front door - yes free.
And what I did to make it lovely!
Subscribe to:
Posts (Atom)